What is SSID?

When you connect to Wi-Fi, you pick a network name from a list. That name? That’s the SSID. But there’s more to it than just a name on your phone screen.

SSID stands for Service Set Identifier. Think of it as your Wi-Fi network’s business card—it’s how your devices recognize and connect to the right wireless network. Every Wi-Fi network has one, and understanding how it works can help you get better internet at home.

Understanding SSID Basics

Your SSID is basically your Wi-Fi network’s public face. When you set up a router, it creates this identifier so your devices know which network to join. Most people just call it the “network name,” and that’s perfectly fine.

What Makes Up an SSID?

SSIDs have some rules they follow:

  • Can be up to 32 characters long
  • Include letters, numbers, spaces, and most symbols
  • Case-sensitive (MyNetwork and mynetwork are different)
  • Must be unique in your area to avoid confusion

Default SSID Examples

When you buy a new router, it comes with a default SSID. Here are real examples from popular brands:

Router Brand Default SSID Format Example
Netgear NETGEAR + model number NETGEAR-R6350
Linksys Linksys + random numbers Linksys00542
ASUS ASUS + model number ASUS_RT-AC68U
TP-Link TP-Link + model TP-Link_Archer_C7

NETGEAR SSID
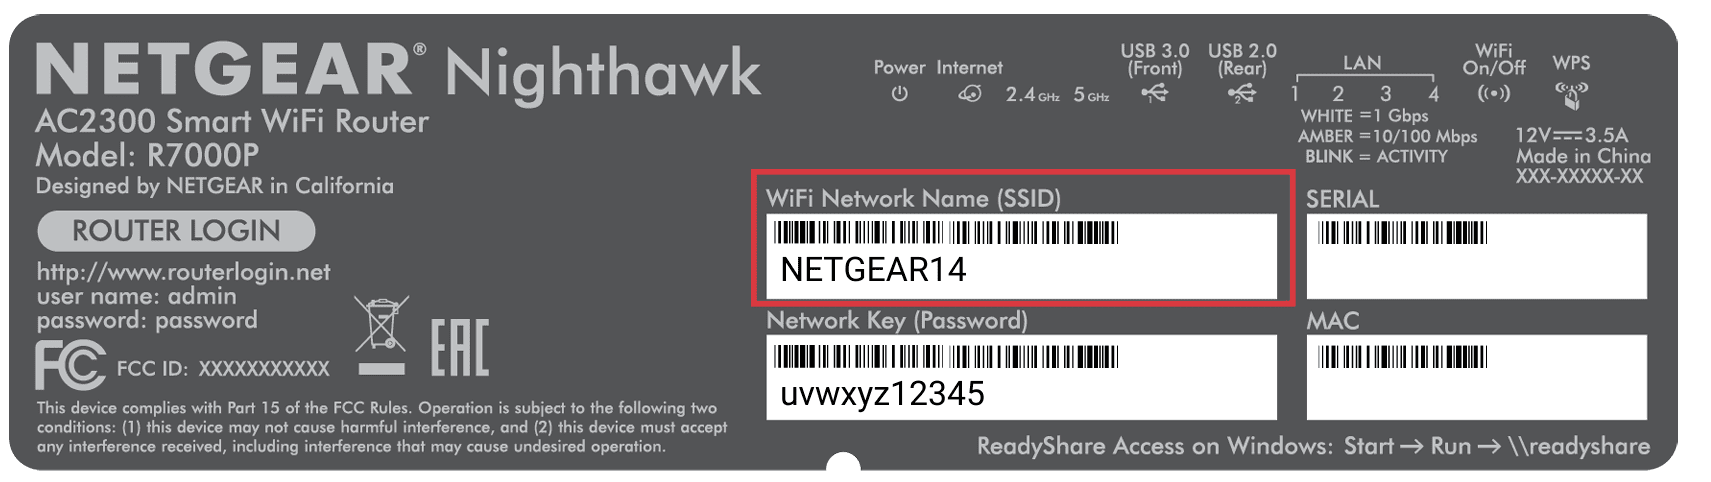
Image source:https://www.expressvpn.com/blog/ssid-for-wi-fi-what-it-means-and-how-to-find-yours/

How to Find Your SSID?

Need to find your network’s SSID? Here are the easiest ways to track it down.

Method 1: Check Your Connected Devices

  1. Open your phone’s Wi-Fi settings
  2. Look for the network with a checkmark or “Connected” status
  3. That’s your current SSID

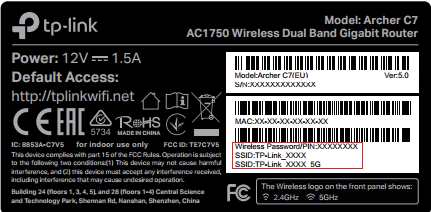
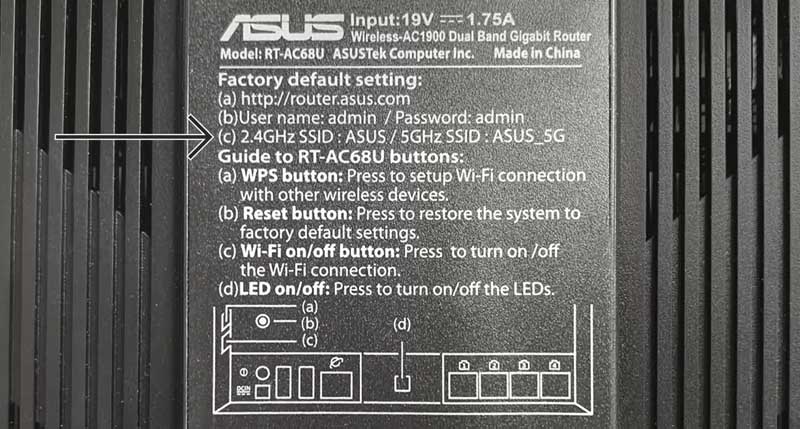
Method 2: Look at Your Router

  1. Find the sticker on your router (usually on the bottom or back)
  2. Look for “Network Name,” “SSID,” or “Wi-Fi Name”
  3. The default SSID will be printed there

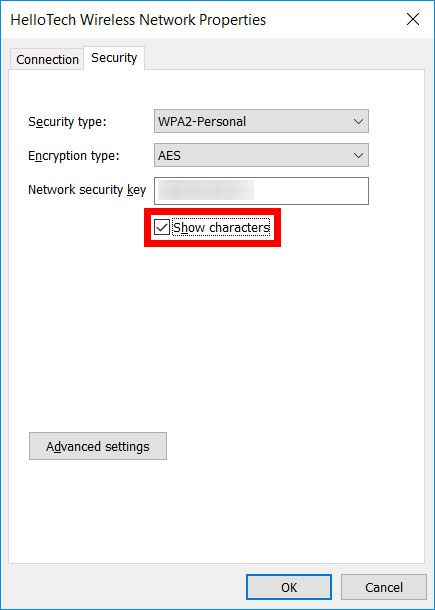
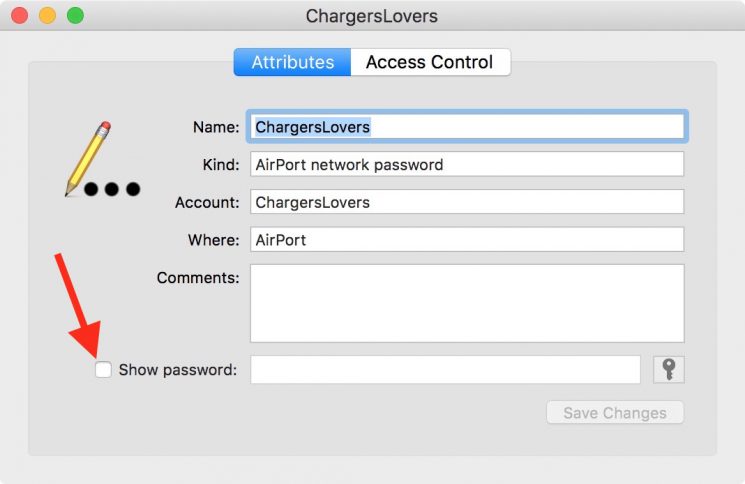
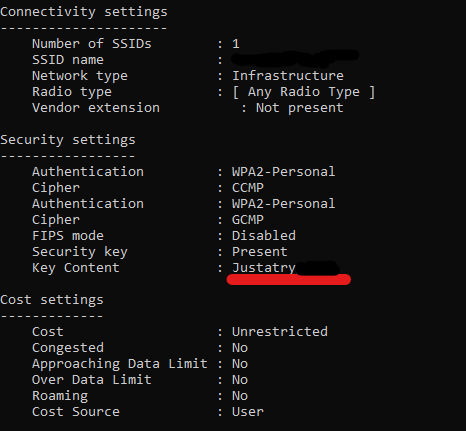
Method 3: Check Router Settings

  1. Connect to your router’s admin panel (usually 192.168.1.1 or 192.168.0.1)
  2. Log in with your router’s password
  3. Go to Wireless or Wi-Fi settings
  4. Your SSID will be displayed in the network name field
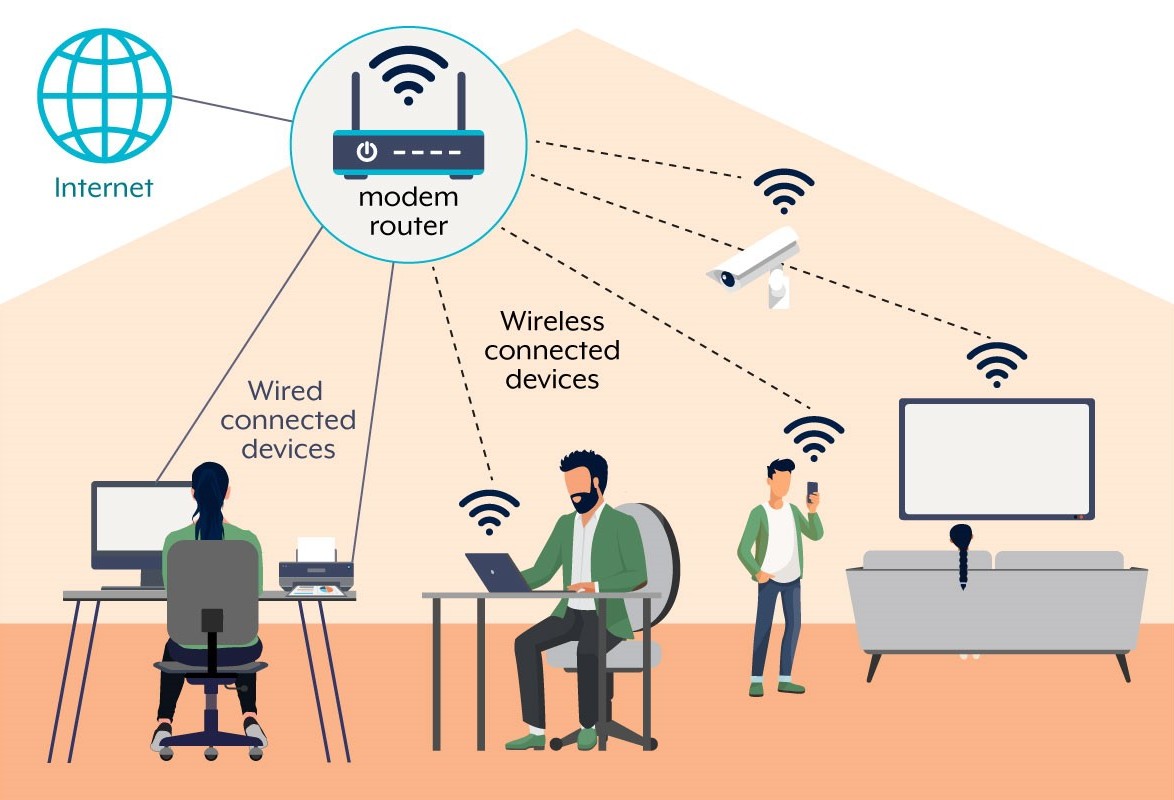
How SSIDs Work?

When your router broadcasts its Wi-Fi signal, it includes the SSID in special packets called beacon frames. These go out about 10 times per second, telling nearby devices “Hey, I’m here, and this is my name.”

The Connection Process

Here’s what happens when you connect to Wi-Fi:

  1. Your device scans for beacon frames from nearby routers
  2. It builds a list of available SSIDs
  3. You pick one and enter the password
  4. Your device and router exchange security information
  5. Connection established

Hidden SSIDs

Some people hide their SSID thinking it makes their network more secure. When hidden, the router still broadcasts, but it doesn’t include the network name in the beacon frames.

Honestly? Hiding your SSID doesn’t add much security. Anyone with basic network tools can still find it. It’s like putting a “Do Not Enter” sign on an unlocked door—it might keep casual people out, but not anyone who really wants in.

SSID Security and Best Practices

Your SSID itself isn’t a security feature, but how you set it up can impact your network’s safety and performance.

Choosing a Good SSID

Follow these tips when naming your network:

  • Avoid personal information (no addresses, names, or phone numbers)
  • Don’t advertise your router brand or model
  • Keep it family-friendly (neighbors can see it)
  • Make it memorable but not obvious
  • Avoid special characters that might cause connection issues

SSID Security Myths

Let’s clear up some common misunderstandings:

Myth Reality
Hiding SSID prevents attacks Real security comes from strong passwords and encryption
Changing SSID regularly improves security A strong password matters more than frequent name changes
Long SSIDs are more secure SSID length doesn’t affect security

Real Security Steps

Want actual security? Focus on these instead:

  1. Use WPA3 encryption (or WPA2 if WPA3 isn’t available)
  2. Create a strong Wi-Fi password (12+ characters with mixed types)
  3. Change the default router admin password
  4. Keep router firmware updated
  5. Turn off WPS if you don’t use it

Common SSID Problems and Solutions

Running into SSID issues? Here’s how to fix the most common problems.

Problem: Can’t See Your Network

If your SSID isn’t showing up in the available networks list:

  1. Check if the router is powered on and working
  2. Move closer to the router (you might be out of range)
  3. Restart your device’s Wi-Fi (turn it off and on again)
  4. Check if the SSID is hidden in router settings
  5. Verify the router is broadcasting on the right frequency (2.4GHz vs 5GHz)
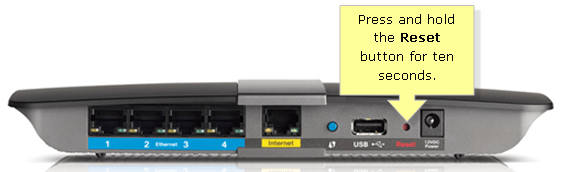
  6. If nothing else works, try resetting your router to factory defaults

Problem: Multiple Networks with Same Name

See duplicate SSIDs? This happens when:

  • Your router broadcasts both 2.4GHz and 5GHz bands with the same name
  • You have a mesh system with multiple access points
  • Neighbors are using the same default SSID

Solution: Change your SSID to something unique, or set up band separation in your router settings.

Problem: Devices Keep Connecting to Wrong Network

If you have multiple SSIDs and devices pick the wrong one:

  1. Give your networks clearly different names (like “HomeWiFi-Fast” and “HomeWiFi-IoT”)
  2. Remove saved networks you don’t want from device settings
  3. Adjust router power settings to control coverage areas

Advanced SSID Settings

Once you understand the basics, you can use SSIDs for more advanced network management.

Multiple SSIDs

Many routers let you create multiple SSIDs on one device. This is handy for:

  • Separating personal and guest traffic
  • Creating different access levels (kids vs adults)
  • Isolating smart home devices
  • Managing bandwidth for different users

Guest Networks

Most modern routers include a guest network feature. This creates a separate SSID that:

  • Keeps visitors off your main network
  • Automatically isolates guest devices from each other
  • Can have different passwords or time limits
  • Protects your personal devices and files

SSID Scheduling

Some routers let you schedule when SSIDs are active. You might:

  • Turn off kids’ network during homework time
  • Disable guest access overnight
  • Reduce IoT device network hours to save power

Quick SSID Tips

Here are some practical tips I’ve picked up over the years:

  • Write down your SSID and password before changing them
  • Take a photo of the router sticker before mounting it somewhere hard to reach
  • If you’re in an apartment, check what SSIDs neighbors are using first
  • Consider adding your apartment number to avoid confusion
  • Test the new SSID with all your devices before calling it done

Now that you understand SSIDs, you’re ready to tackle other Wi-Fi topics. You might want to learn about recovering Wi-Fi passwords, finding your router’s IP address, or protecting your Wi-Fi network.

The most important thing? Your SSID is just the starting point. Good Wi-Fi performance comes from proper router placement, strong security settings, and keeping your equipment updated. But hey, at least now you know what that network name actually means!

What is an IP Address?

Think of an IP address like your home’s mailing address, but for devices connected to the internet. Just like the postal service needs your street address to deliver mail, computers need IP addresses to send data to the right place. Every device connected to a network gets its own unique IP address so other devices can find it.

You’ve probably seen IP addresses before – they look like a series of numbers separated by dots, such as 192.168.1.1 or 216.58.194.174. But there’s more to these number sequences than meets the eye.

Understanding How IP Addresses Work

IP stands for “Internet Protocol,” which is basically the set of rules that governs how data travels across networks. When you type a website name into your browser, your computer uses IP addresses behind the scenes to connect to that site’s server.

Here’s what happens when you visit a website:

  1. Your computer asks a DNS server to translate the website name (like google.com) into an IP address
  2. The DNS server responds with the IP address (like 216.58.194.174)
  3. Your computer uses that IP address to connect directly to Google’s server
  4. The server sends back the webpage data to your computer’s IP address

This whole process happens in milliseconds, which is why web pages load so quickly.

Types of IP Addresses You’ll Encounter

IPv4 vs IPv6 Addresses

You’ll run into two main versions of IP addresses. Most of the time, you’re dealing with IPv4 addresses, but IPv6 is becoming more common.

Feature IPv4 IPv6
Format 192.168.1.1 2001:0db8:85a3:0000:0000:8a2e:0370:7334
Length 32 bits 128 bits
Total Addresses About 4.3 billion About 340 trillion trillion trillion
Typical Use Most home networks Newer networks and mobile carriers

IPv4 addresses use four numbers between 0 and 255, separated by periods. IPv6 addresses use eight groups of four hexadecimal characters, separated by colons. Don’t worry if IPv6 looks complicated – most routers handle the conversion automatically.

Public vs Private IP Addresses

Not all IP addresses work the same way. Some are designed for use on the internet, while others only work within your local network.

Public IP addresses are what the outside world sees. Your internet service provider assigns one to your home router, and it’s how websites know where to send information back to you. Think of it as your home’s street address.

Private IP addresses work only within your local network. Your router assigns these to each device in your home – your laptop, phone, smart TV, and so on. These are like apartment numbers within your building.

Here are the private IP address ranges you’ll commonly see:

  • 192.168.x.x – Most home routers use this range
  • 10.x.x.x – Often used in larger office networks
  • 172.16.x.x to 172.31.x.x – Less common, but still used in some business networks
    different types of ip address
    Image source:https://www.pynetlabs.com/types-of-ip-address/

How to Find Your IP Address

You might need to find your IP address for troubleshooting network problems or setting up certain software. Here’s how to find both your public and private IP addresses.

Finding Your Public IP Address

This is the easiest one to find:

  1. Open your web browser
  2. Go to whatismyipaddress.com or search “what is my IP” in Google
  3. The website will immediately show your public IP address

Your public IP address is the same for all devices in your home since they all share your router’s internet connection.

Finding Your Private IP Address

The method depends on your device’s operating system.

On Windows:

  1. Press Windows key + R to open the Run dialog
  2. Type “cmd” and press Enter
  3. Type “ipconfig” and press Enter
  4. Look for “IPv4 Address” under your network adapter

On Mac:

  1. Click the Apple menu and select “System Preferences”
  2. Click “Network”
  3. Select your active connection (usually Wi-Fi or Ethernet)
  4. Your IP address appears in the main window

On smartphones:

  1. Go to Settings
  2. Tap Wi-Fi (iPhone) or Connections > Wi-Fi (Android)
  3. Tap the “i” icon next to your network name
  4. Your IP address is listed under network details

Common IP Address Ranges and What They Mean

Different IP address ranges serve different purposes. Here’s what you need to know about the most common ones:

IP Range Purpose Where You’ll See It
192.168.1.x Home network devices Most Linksys, Netgear routers
192.168.0.x Home network devices Many D-Link, TP-Link routers
10.0.0.x Large private networks Corporate networks, some newer routers
127.0.0.1 Localhost/loopback Testing, local development
169.254.x.x Automatic assignment failure Network troubleshooting scenarios

If you see a 169.254.x.x address on your device, that usually means your router isn’t working properly or your device can’t connect to it.

Why IP Addresses Matter for You

Understanding IP addresses helps you in several practical ways:

  • Network troubleshooting – When your internet isn’t working, checking your IP address is often the first step
  • Home automation – Smart devices often need their IP addresses for setup and configuration
  • Remote access – Accessing your home computer from work requires knowing IP addresses
  • Gaming – Some games perform better with specific IP settings or port forwarding
  • Security – Monitoring unusual IP addresses can help identify potential security threats

Troubleshooting Common IP Address Problems

Here are solutions for the most frequent IP address issues you might encounter:

Problem: Can’t Connect to the Internet

If your device shows a 169.254.x.x address, try these steps:

  1. Unplug your router for 30 seconds, then plug it back in
  2. On your device, forget and reconnect to your Wi-Fi network
  3. Check if other devices can connect to rule out router issues
  4. Contact your internet service provider if the problem persists

Problem: Two Devices Have the Same IP Address

This creates conflicts and connection problems. Here’s how to fix it:

  1. Restart both devices experiencing the conflict
  2. Access your router’s admin panel (usually at 192.168.0.1 or 192.168.1.1)
  3. Log in using your router’s password (often printed on the device)
  4. Look for DHCP settings and restart the DHCP service
  5. If problems continue, assign static IP addresses to specific devices

Problem: Can’t Access Router Settings

Sometimes you can’t reach your router’s configuration page:

  1. Make sure you’re connected to your home network
  2. Try common router IP addresses: 192.168.0.1, 192.168.1.1, or 10.0.0.1
  3. Check your device’s default gateway address using the ipconfig command
  4. Use that gateway address in your browser’s address bar

Keeping Your Network Secure

Your IP address can reveal information about your location and internet service provider. Here are simple ways to protect yourself:

  • Change default router passwords – Most routers come with weak default passwords like “admin” or “password”
  • Keep router firmware updated – Manufacturers regularly release security patches
  • Use strong Wi-Fi passwords – Choose complex passwords that include numbers, letters, and symbols
  • Consider a VPN – Virtual private networks hide your real IP address from websites
  • Monitor connected devices – Regularly check which devices are connected to your network

How to Protect Your WiFi Network?

Your WiFi network is like the front door to your digital life. Unfortunately, many people leave it wide open without realizing it. If you’re using the default settings that came with your router, you’re basically inviting trouble.

Don’t worry though – protecting your network isn’t rocket science. With a few simple changes, you can lock down your WiFi and keep unwanted visitors out. This guide will walk you through everything you need to know, from basic password changes to advanced security features.secure wifi router

Why WiFi Security Matters

Think about everything connected to your network right now. Your laptop, phone, smart TV, maybe even your doorbell or thermostat. Each device is a potential entry point for someone with bad intentions.

Here’s what can happen if your network gets compromised:

  • Someone steals your personal files and photos
  • Hackers access your bank accounts and credit card information
  • Your internet speed slows to a crawl because neighbors are using your connection
  • Criminals use your network for illegal activities, which could get traced back to you
  • Someone gains control of your smart home devices

The good news? Most attacks can be prevented with basic security measures that take less than an hour to set up.

What You’ll Need Before Starting

Before we jump into the protection steps, make sure you have:

  • A computer or smartphone connected to your WiFi network
  • Your router’s admin password (often found on a sticker on the router itself)
  • About 30-45 minutes of time
  • A pen and paper to write down your new passwords

If you can’t find your router’s admin password, you can check our router default passwords guide or reset it if needed.

Step-by-Step WiFi Protection Guide

Change Your Default Router Password

This is the most important step. Your router comes with a default admin password that’s either printed on the device or something generic like “admin” or “password.” Hackers know these defaults, so changing it should be your first move.

  1. Open your web browser and type your router’s IP address in the address bar (usually 192.168.0.1 or 192.168.1.1)
  2. Enter the current admin username and password when prompted
  3. Look for “Administration,” “System,” or “Router Settings” in the menu
  4. Find “Change Password” or “Admin Password”
  5. Create a strong new password with at least 12 characters, including numbers and symbols
  6. Save the changes and write down your new password somewhere safe

Not sure what your router’s IP address is? Here are the most common ones by brand:

Router Brand Default IP Address Default Username Default Password
Netgear 192.168.1.1 admin password
TP-Link 192.168.0.1 admin admin
Linksys 192.168.1.1 admin admin
ASUS 192.168.1.1 admin admin
D-Link 192.168.0.1 admin (blank)

Pro tip: If you can’t access your router at 192.168.1.1, try 192.168.0.1 or 10.0.0.1. Different brands use different default addresses. If you’re still having trouble, check our guide on how to find your router’s IP address.

Update Your WiFi Network Name and Password

Your network name (SSID) and WiFi password are what devices use to connect. If you’re still using something like “NETGEAR_2.4G” with the password printed on your router, it’s time for an upgrade.

  1. In your router’s admin panel, look for “Wireless,” “WiFi Settings,” or “WLAN”
  2. Find the “Network Name” or “SSID” field
  3. Change it to something unique but don’t include personal information like your address
  4. Locate the “WiFi Password,” “Passphrase,” or “Network Key” field
  5. Create a strong password with at least 15 characters
  6. Save the settings and restart your router
  7. Reconnect all your devices with the new password

Avoid using common words or personal information in your network name. Something like “PrettyFlyForAWiFi” works better than “JohnSmith_WiFi.”

Enable WPA3 Security (or WPA2 if WPA3 isn’t available)

WPA3 is the latest and strongest security protocol for WiFi networks. If your router doesn’t support it, WPA2 is still much better than the older WEP or no security at all.

  1. In the wireless settings section, look for “Security Mode,” “Authentication,” or “Encryption”
  2. Select “WPA3-Personal” if available, or “WPA2-Personal” as your second choice
  3. If you see options like “WPA2/WPA3 Mixed,” choose that for compatibility with older devices
  4. Make sure “AES” is selected as the encryption method
  5. Save the changes

Never choose “WEP” or “Open” security. WEP can be cracked in minutes, and open networks have no protection at all.

Turn Off WPS

WiFi Protected Setup (WPS) was designed to make connecting devices easier, but it actually creates a major security hole. Hackers can exploit WPS to break into your network even if you have a strong password.

  1. Look for “WPS,” “WiFi Protected Setup,” or “Quick Connect” in your router settings
  2. Turn off or disable WPS completely
  3. If you see separate options for “WPS Push Button” and “WPS PIN,” disable both
  4. Save the changes

You might need to manually enter your WiFi password on new devices instead of using the WPS button, but the extra security is worth it.

Update Router Firmware

Router manufacturers regularly release firmware updates to fix security vulnerabilities. Running outdated firmware is like leaving your doors unlocked.

  1. In your router’s admin panel, look for “Administration,” “System,” or “Router Update”
  2. Find “Firmware Update,” “Router Update,” or “System Update”
  3. Check your current firmware version and note it down
  4. Click “Check for Updates” or visit your router manufacturer’s website
  5. If an update is available, download and install it (this usually takes 5-10 minutes)
  6. Don’t turn off your router during the update process

Some newer routers can update automatically. If you see this option, turn it on to stay protected without having to remember to check manually.

Enable Firewall Protection

Your router’s built-in firewall acts like a security guard, deciding what traffic can enter or leave your network.

  1. Look for “Firewall,” “Security,” or “Access Control” in your router settings
  2. Make sure the firewall is enabled or turned on
  3. Set the security level to “High” or “Maximum” if given options
  4. Enable “SPI Firewall” or “Stateful Packet Inspection” if available
  5. Turn on “DoS Attack Protection” if you see this option
  6. Save your changes

Set Up Guest Network

A guest network gives visitors internet access without letting them see your main devices or files. It’s like having a separate entrance for guests.

  1. Find “Guest Network,” “Guest Access,” or “Visitor Network” in your router settings
  2. Enable the guest network feature
  3. Give your guest network a different name from your main network
  4. Set a password for the guest network (yes, even guest networks need passwords)
  5. Set time limits if available (like 24 hours for automatic disconnection)
  6. Disable “Allow guests to access local network” if you see this option
  7. Save the settings

Advanced Security Settings

Once you’ve covered the basics, these additional steps can provide even stronger protection:

Setting What It Does Recommended Action
MAC Address Filtering Only allows specific devices to connect Enable for high-security environments
Access Control Blocks websites and sets time limits Useful for families with children
VPN Server Secure remote access to your network Enable if you work from home
Remote Management Allows internet access to router settings Disable unless absolutely necessary

Signs Your Network Might Be Compromised

Watch out for these warning signs that someone might be using your network without permission:

  • Your internet is much slower than usual, especially during specific times
  • You see unknown devices in your router’s connected device list
  • Your data usage has increased significantly without explanation
  • You receive notifications about logins from unfamiliar locations
  • Your router’s lights are more active than normal when you’re not using the internet
  • Websites you visit are acting strange or redirecting to unexpected pages

If you notice any of these signs, change your WiFi password immediately and check your router’s security settings.

Troubleshooting Common Issues

Can’t Access Router Settings

If you can’t get to your router’s admin panel, try these solutions:

  1. Make sure you’re connected to your WiFi network, not mobile data
  2. Try different IP addresses: 192.168.1.1, 192.168.0.1, or 10.0.0.1
  3. Look for the correct IP address on your router’s label
  4. Reset your router by holding the reset button for 10 seconds (this will erase all settings) – see our complete router reset guide for detailed steps

Devices Won’t Connect After Changes

This usually happens when you change security settings. Here’s how to fix it:

  1. On your device, “forget” the old network connection
  2. Search for WiFi networks and select yours
  3. Enter the new password exactly as you set it
  4. Make sure your device supports the security type you chose (some older devices don’t work with WPA3)

Router Keeps Losing Settings

If your router forgets your changes after restarting:

  • Make sure you click “Save” or “Apply” after making changes
  • Wait for the router to fully restart before making additional changes
  • Your router might be failing – consider replacing it if it’s more than 5 years old

Maintaining Your Network Security

Protecting your WiFi isn’t a one-time task. Here’s what you should do regularly:

  • Check for firmware updates every 3 months
  • Change your WiFi password every 6-12 months
  • Review connected devices monthly and remove any you don’t recognize
  • Monitor your internet usage through your ISP’s app or website
  • Replace your router every 4-5 years or when it stops receiving security updates

Consider setting a reminder on your phone to check these settings quarterly. It only takes a few minutes and can save you from major headaches later.

How To Recover WiFi Username and Password?

Forgetting your WiFi network name (SSID) and password is one of the most common tech frustrations. Whether you’re setting up a new device, helping a guest connect, or simply can’t remember the details you set up months ago, there are several reliable methods to recover this information. This guide will walk you through multiple approaches, from the simplest solutions to more advanced techniques.

Method 1: Check Your Router’s Physical Label

The easiest way to find your WiFi information is often right on your router itself. Most modern routers come with a sticker containing the default network details.

  1. Locate your wireless router or modem-router combination device.
  2. Look for a white or colored sticker on the back, bottom, or side of the device.
    tp-link label default wifi username and password
    asus label default wifi network name and password
  3. Find the section labeled “WiFi,” “Wireless,” “WLAN,” or “Network.”
  4. Write down the network name (SSID) and password (sometimes called “Key,” “Passphrase,” or “WPA Key”).

Note: This method only works if you haven’t changed the default settings. If you’ve customized your network name or password (read this tutorial for how to change WiFi password), you’ll need to try other methods.

Method 2: Check Connected Devices

If you have devices already connected to your WiFi network, you can often retrieve the password from their settings.

On Windows 10/11

  1. Right-click the WiFi icon in your system tray.
  2. Select “Open Network & Internet settings.”
  3. Click “WiFi” in the left sidebar.
  4. Click “Manage known networks.”
  5. Find your network and click “Properties.”
    Windows 10 11 show wifi-password
  6. Check the “Show characters” box to reveal your password.

On Mac

  1. Open “Keychain Access” from Applications > Utilities.
  2. Search for your WiFi network name.
  3. Double-click the network entry.
    Mac show wifi password
  4. Check “Show password” and enter your Mac login password when prompted.

On iPhone/iPad

  1. Go to Settings > WiFi.
  2. Tap the “i” icon next to your connected network.
    find wifi password on iphone ios
  3. Tap “Password” (iOS 16 and later) or use the share feature to display a QR code.
  4. Use Face ID, Touch ID, or your passcode to reveal the password.

Method 3: Use Command Prompt (Windows)

Windows stores WiFi passwords for networks you’ve previously connected to, and you can retrieve them using Command Prompt.

  1. Press Windows key + R to open the Run dialog.
  2. Type “cmd” and press Enter to open Command Prompt.
  3. Type the following command and press Enter:
    netsh wlan show profiles
  4. Find your network name in the list of profiles.
  5. Type the following command, replacing “YourNetworkName” with your actual network name:
    netsh wlan show profile name="YourNetworkName" key=clear
    Use Command Prompt to show wifi password
  6. Look for the “Key Content” field under Security settings to find your password.

Method 4: Reset Your Router to Factory Defaults

If all other methods fail, you can reset your router and start fresh. This should be your last resort as it will erase all custom settings.

  1. Locate the small reset button on your router (usually recessed and requiring a paperclip).
  2. With the router powered on, press and hold the reset button for 10-30 seconds.
    reset router
  3. Release the button and wait for the router to restart completely (usually 1-2 minutes).
  4. The router will return to factory settings, including the default network name and password printed on the device label.
  5. Reconnect your devices using the default information from the router’s sticker.

Tips for Managing Your WiFi Password

Once you’ve recovered your WiFi information, consider these best practices:

  • Write down your network name and password in a secure location
  • Use a password manager to store your WiFi password digitally
  • Create a strong, memorable password if you’re setting up a new one
  • Consider setting up a guest network for visitors
  • Update your router’s firmware regularly for security

How To Reset Your Router?

Router issues can be frustrating, especially when your internet connection becomes slow or completely stops working. Resetting your router is often the quickest solution to resolve connectivity problems, improve performance, or prepare the device for a new setup. Whether you’re dealing with frequent disconnections or need to clear your network settings, this guide will walk you through the entire process step by step.

When Should You Reset Your Router?

Before jumping into a reset, it’s important to understand when this action is necessary. Resetting should be considered when you experience persistent network problems that simpler troubleshooting steps cannot fix.

Consider resetting your router in these situations:

  • Internet connection frequently drops or becomes unstable
  • Extremely slow browsing speeds despite good signal strength
  • Unable to connect new devices to your network
  • Forgotten your WiFi password and cannot access router settings
  • Router firmware appears corrupted or unresponsive
  • Preparing to sell or give away your router
  • Suspecting unauthorized access to your network

Types of Router Resets

Understanding the difference between reset types will help you choose the right approach for your situation. There are two main methods to reset your router, each serving different purposes.

Reset Type What It Does When to Use
Soft Reset (Restart) Restarts the router without changing settings Minor connectivity issues, slow performance
Hard Reset (Factory Reset) Erases all settings and returns to default configuration Major problems, forgotten passwords, security concerns

How to Perform a Soft Reset

A soft reset is the gentler option that simply restarts your router without erasing your personal settings. This method resolves most temporary connectivity issues and should always be tried first.

Method 1: Using the Power Button

  1. Locate the power button on your router (usually on the back or side)
  2. Press and hold the power button for 3-5 seconds until all lights turn off
  3. Wait 10-15 seconds for the router to completely shut down
  4. Press the power button again to turn the router back on
  5. Allow 2-3 minutes for the router to fully boot up and establish connections
  6. Check if your devices can connect to the internet normally

Method 2: Unplugging the Power Cable

  1. Unplug the power adapter from the back of your router
  2. Wait 15-20 seconds to ensure all internal components reset
  3. Plug the power adapter back into the router
  4. Wait for all status lights to stabilize (typically 2-3 minutes)
  5. Test your internet connection on multiple devices

Tip: During the restart process, you’ll see various colored lights flashing on your router. This is normal behavior as the device reconnects to your internet service provider and establishes network connections.

How to Perform a Hard Reset (Factory Reset)

A factory reset completely erases all your custom settings including WiFi passwords, port forwarding rules, and security configurations. Only proceed with this method when a soft reset doesn’t solve your problems.

Using the Reset Button

  1. Ensure your router is powered on and functioning
  2. Locate the small reset button (usually recessed and labeled “Reset”)
    reset router
  3. Using a paperclip or similar thin object, press and hold the reset button
  4. Continue holding for 10-15 seconds while the router is powered on
  5. Release the button and wait for the router to restart automatically
  6. Allow 3-5 minutes for the complete reset process to finish
  7. Look for the default network name (SSID) to appear in your WiFi list

Warning: A factory reset will erase all your personalized settings. Make sure you have your internet service provider’s connection details and desired WiFi password ready for reconfiguration.

Through the Router’s Web Interface

If you can still access your router’s settings, you can perform a factory reset through the admin panel:

  1. Connect your computer to the router via Ethernet cable or WiFi
  2. Open a web browser and enter your router’s IP address
  3. Log in using your admin username and password
  4. Navigate to “System,” “Administration,” or “Advanced” settings
  5. Look for “Factory Reset,” “Reset to Default,” or “Restore” options
  6. Click the reset option and confirm your choice when prompted
  7. Wait for the router to restart and return to factory defaults

Common router IP addresses to try:

  • 192.168.1.1 (most common)
  • 192.168.0.1
  • 10.0.0.1
  • 192.168.1.254

What to Do After Resetting Your Router

After performing a factory reset, your router returns to its original manufacturer settings. You’ll need to reconfigure everything to restore your network functionality.

Initial Setup Steps

  1. Connect your computer directly to the router using an Ethernet cable
  2. Access the router’s setup page using the default IP address
  3. Use the default username and password (often “admin/admin” or “admin/password”)
  4. Run the setup wizard or configure settings manually
  5. Enter your internet service provider’s connection details
  6. Create a new WiFi network name and strong password
  7. Set up security protocols (WPA3 or WPA2 recommended)
  8. Update the router’s firmware if prompted
  9. Test the connection on all your devices

Tip: Write down your new WiFi password and keep it in a safe place. Consider using a password manager to store all your network credentials securely.

Troubleshooting Common Issues

Sometimes reset procedures don’t go as smoothly as expected. Here are solutions to common problems you might encounter during or after resetting your router.

Router Won’t Reset

  • Ensure the router is receiving power by checking all cable connections
  • Try holding the reset button for a longer period (up to 30 seconds)
  • Use a different thin object to press the reset button more firmly
  • Attempt the reset while the router is starting up

Can’t Access Router Settings After Reset

  • Clear your browser’s cache and cookies
  • Try accessing the router from a different device or browser
  • Ensure your computer’s IP settings are set to automatic
  • Check the router’s label for the correct default IP address

Internet Still Not Working After Reset

  • Contact your internet service provider to verify account status
  • Double-check all cable connections between router and modem
  • Restart your modem as well as the router
  • Verify you entered the correct ISP settings during setup

Preventing Future Router Problems

Regular maintenance can help prevent many issues that require router resets. Consider implementing these practices to keep your network running smoothly.

  • Restart your router monthly to clear temporary files and refresh connections
  • Keep firmware updated to the latest version for security and performance
  • Position the router in a well-ventilated area to prevent overheating
  • Use strong, unique passwords for both WiFi and admin access
  • Monitor connected devices and remove any unknown or unwanted connections
  • Consider upgrading older routers that frequently require resets

Resetting your router is a valuable troubleshooting skill that can resolve many network problems quickly and effectively. Whether you need a simple restart or complete factory reset, following these steps will help restore your internet connection and improve your network’s performance. Remember to always try a soft reset first, and keep your important network information handy for easy reconfiguration after a factory reset.