
192.168.0.1 is a private IP address commonly used as the default gateway for various router brands to access the admin panel settings. This IP address allows you to configure wireless settings, change WiFi passwords, set up guest networks, manage parental controls, and adjust other necessary router configurations.
How to login to 192.168.0.1?
To access your router’s admin panel through 192.168.0.1, follow these steps:
- Ensure your device is connected to the router’s network via WiFi or an Ethernet cable.
- Open any web browser (Chrome, Firefox, Safari, or Edge).
- Type http://192.168.0.1 in the address bar and press Enter.
- Enter the default username and password when prompted.
- Click “Login” to access the router’s admin interface.
Note: Ensure you’re typing the IP address correctly. Common mistakes include typing 192.168.o.1 (with letter ‘o’) instead of 192.168.0.1 (with number ‘0’). Also, don’t use “www” or “https” at the beginning. If 192.168.0.1 doesn’t work, you may need to find your router’s IP address, as some routers use different default addresses.
Forgot Username and Password?
If you can’t remember your login details:
- Look for a sticker on the back or bottom of your router showing default credentials.
- Review the router documentation or the manufacturer’s website.
- If you changed the password and forgot it, perform a hard reset by pressing and holding the reset button for 10-15 seconds using a paperclip or needle.
Always change default passwords after initial setup. Default credentials are widely known and pose security risks. Use strong, unique passwords combining letters, numbers, and special characters.
How to Change Router IP Address?
Your router comes with a default gateway IP address assigned by the manufacturer, but you can easily customize it to meet your specific needs. Many users change their router’s IP address to enhance security, prevent unauthorized access to the admin panel, reduce the risk of DDoS attacks, or simply add an extra layer of protection to their home network.
Changing your router’s IP address is a straightforward process, though the exact steps vary depending on your router brand. Here’s how to modify the IP address on the most popular router models.
TP-Link Router:
- Open your web browser and navigate to 192.168.0.1 or 192.168.1.1
- Log in using the default username and password (both are usually “admin”)
- Navigate to Advanced Settings, then select Network, followed by LAN
- Find the “IP Address” field and enter your preferred address, such as 192.168.1.2
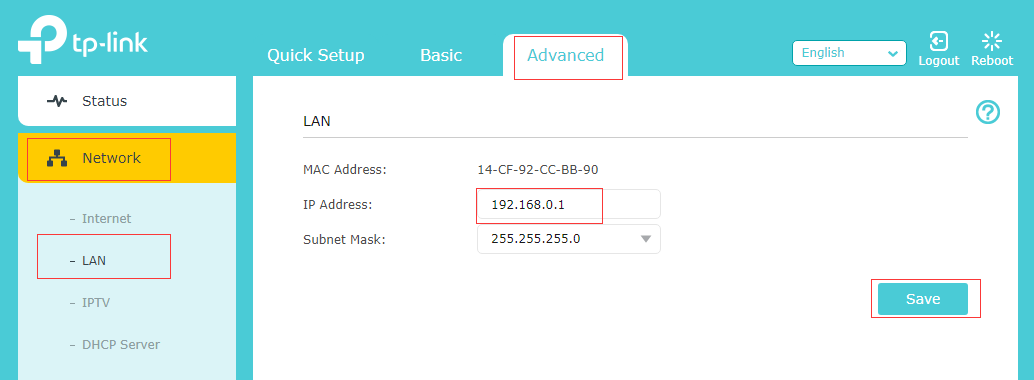
- Click Save to apply the changes
- Wait for the router to reboot automatically
ASUS Router:
- Access your ASUS router configuration page through your web browser
- Enter the login password (username is “admin” and password is either “admin” or left blank)
- Go to LAN, then select LAN IP
- Locate the IP Address field
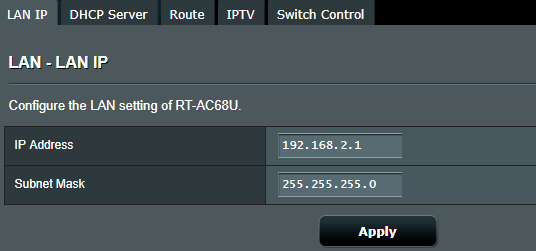
- Change the IP address to your desired setting
- Click Apply to confirm the changes
NETGEAR Router:
- Access your NETGEAR router settings via 192.168.1.1, 192.168.0.1, or visit http://www.routerlogin.net
- Log in with the default password (username is “admin” and password is “password”)
- Click on Advanced from the main menu
- Navigate to Setup, then select LAN Setup from the left sidebar
- Under LAN TCP/IP Setup, find the IP Address field
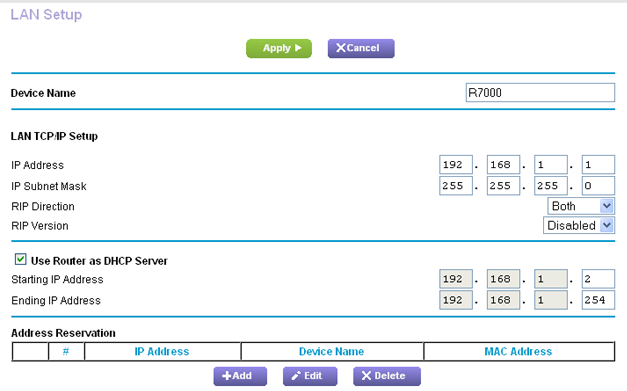
- Change the address from the default to your preferred setting
- Click Apply Changes and allow the system to reboot
If anything goes wrong during the process, you can reset your router to factory default settings, so all your custom changes will be removed.
Securing your WiFi network is important to block unauthorized users. Apply these basic security measures, like turning on WPA2 encryption, creating a strong password, turning off WPS, which provides more security since it is an outdated network connection method, activating MAC-address filtering, and keeping your router firmware updated regularly. Here is a detailed guide on how to secure your WiFi network.