
To access CenturyLink router settings, connect your device to the router’s WiFi network or use an Ethernet cable connection.
How to Login to CenturyLink Router
Accessing your CenturyLink router’s administrative interface requires a proper network connection. You can establish this connection wirelessly through WiFi or by using a direct Ethernet cable connection to your router. An active internet connection is not required for router configuration.
Follow these steps to log into your CenturyLink router settings:
- Open your preferred web browser on a device connected to the CenturyLink network.
- Type the default CenturyLink router IP address http://192.168.0.1 in the URL bar and press Enter.

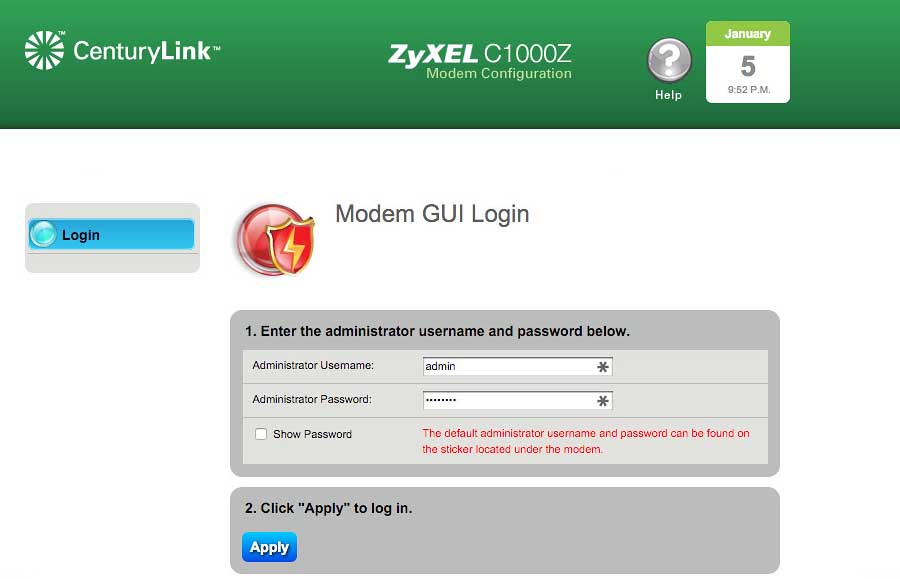
- The CenturyLink router login page will appear, requesting Administrator Username and Password.
- Enter your administrator username and password. If unchanged from defaults, check the router label for password information.
- Click “Apply” or “Login” to access the router’s configuration interface.
- You’ll be directed to the router’s home page where various settings can be configured.
Change CenturyLink WiFi SSID
The SSID (Service Set Identifier) represents your WiFi network’s name that appears when devices search for available networks. CenturyLink routers ship with default SSIDs that can be difficult to identify and remember, making customization beneficial for easier network recognition.
To modify your CenturyLink WiFi network name:
- Access the router settings page using the login method described above.
- Navigate to the router home page and click on “Wireless Setup”.
- Select “SSID Setup” from the left navigation menu.
- Choose the specific SSID you want to modify from the available options.
- Scroll down to locate the SSID name field.
- Enter your preferred network name in the designated field.
- Click “Apply” to save your changes.
Change CenturyLink WiFi Password
Default WiFi passwords on CenturyLink routers consist of random alphanumeric combinations printed on the router’s back label. These passwords are typically complex and difficult to memorize, prompting many users to create more memorable alternatives while maintaining security standards.
To update your CenturyLink WiFi password:
- Log into the router settings page following the previously outlined steps.
- Click on “Wireless Setup” from the router settings page.
- Select “Wireless Security” from the left menu options.
- Choose the SSID for which you want to change the network password.
- Set the security type to “WPA2 – Personal” for optimal protection.
- Scroll down and select “Use Custom Security Key/Passphrase” option.
- Input your new WiFi password in the “Security Key/Passphrase” field.
- Click “Apply” to save the configuration changes.
- The router will automatically reboot, after which you can connect using the new password.
Troubleshooting Connection Issues
If you encounter difficulties accessing your CenturyLink router at 192.168.0.1, several common issues might be preventing successful connection:
- Verify your device is properly connected to the CenturyLink router via WiFi or Ethernet cable
- Ensure you’re typing 192.168.0.1 correctly without extra characters or typos
- Clear your browser cache and cookies, or try a different web browser
- Temporarily disable firewall or antivirus software that might block local network access
- Check that your CenturyLink router is powered on and functioning normally
- Some CenturyLink models may use 192.168.1.1 or 10.0.0.1 instead